How can I retrieve the virtual MAC address from the Wi-Fi Range Extender to setup an Access List?
This article will provide instructions on how to add the correct MAC address into the Access List (also known as ACL or MAC Filtering) on a router and to add a NETGEAR WiFi Range Extender (EX6100/EX6200) onto an existing LAN network.
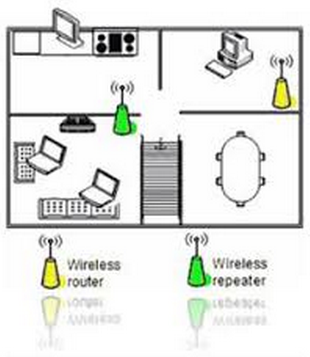
When an Access List is enabled on the existing Router, access will only be granted to the specified devices in the Access List. When using a NETGEAR WiFi Range extender, wirelessly connected to the router, the MAC addresses of all the connected wired and wireless clients will be replaced by a virtual address. Generally, the correct procedure is to disable the Access List, connect the clients to the router through the Extender and then add the MAC addresses on the Attached Devices page. The problem exists only when the router does not have an Attached Devices page. In such case, the virtual MAC address needs to be manually retrieved.
To retrieve the MAC address:
The two real MAC addresses can be found on the label on the back (EX6200) or on the bottom (EX6100):
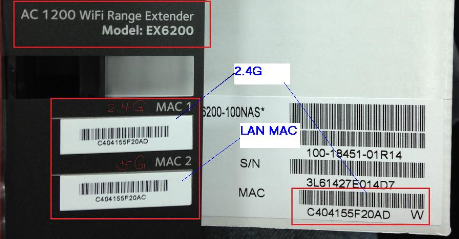
(the image above shows the EX6200 MAC addresses labels printed on the unit and the Retail box)
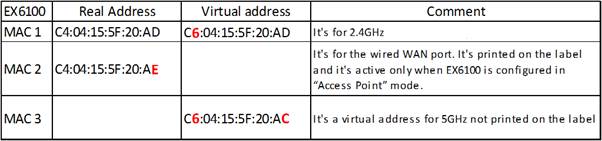
The EX6200, as the image above shows, uses the MAC1 for the 2.4GHz Wireless card and the MAC2 for the LAN card. A third MAC address (not printed) is used for the 5GHz and virtually obtained from the real MAC1 address. To obtain this virtual address the 7th bit of the first hexadecimal number needs to be toggled. Considering the MAC1 address in the picture above C4:04:15:5F:20:AD ‘C4’ is the first number (hexadecimal) and it is equal to 1100/0100 in binary. The bit to toggle is the 7th from left to the right. After toggling the bit to 1 we obtain 1100/0110 = ‘C6’ (See hexadecimal table below). Therefore if MAC 1 = C4:04:15:5F:20:AD then MAC 3 = C6:04:15:5F:20:AD, this is the virtual address for the 5GHz.
The EX6100 instead, uses virtual addresses for both 2.4 and 5GHz Network interfaces when connecting to the main router. MAC1, just toggle the bit as shown earlier C6:04:15:5F:20:AD MAC3 is MAC1 minus 1 C4:04:15:5F:20:AC (See hexadecimal table below) Then we toggle the bit as per EX6200 C6:04:15:5F:20:AC The two tables below provide further information regarding the two Range Extenders MAC address usage:

Once the virtual MAC addresses have been obtained, the ACCESS LIST on the router can be created or correctly updated: As an example, using the MAC addresses in the above tables and the following MAC address for a Wireless client: A4:C3:61:46:CB:3C
If the LAN setup is:
Wireless Router >> 2.4GHz connection >>(NETGEAR WIFI RANGE EXTENDER)>> WClient
For the EX6100, the MAC addresses to add in the Router Access List are:
- C6:04:15:5F:20:AD (2.4GHz)
- 02:0F:B5:46:CB:3C (Wireless Client)
For EX6200, use the following:
- C4:04:15:5F:20:AD (2.4GHz)
- 02:0F:B5:46:CB:3C (Wireless Client)
If the LAN setup is:
Wireless Router >> 5GHz connection >>(NETGEAR WIFI RANGE EXTENDER)>> WClient
For the EX6100, the MAC addresses to add in the Router Access List are:
- C6:04:15:5F:20:AC (5GHz)
- 02:0F:B5:46:CB:3C (Wireless client)
For EX6200, use the following:
- C6:04:15:5F:20:AD (5GHz)
- 02:0F:B5:46:CB:3C (Wireless Client)
If the Wireless clients real MAC address starts with 02:0f:B5, then it is possible to select an alternative virtual MAC address for the clients. There’s a list of 6 available selections (although in most cases 02:0f:B5 will work):
02:0F:B5
02:09:5B
02:14:6C
02:18:4D
02:1B:2F
02:1E:2A