WP开发实例:在wp中实现Android和ios中的菜单栏
第一次用wp的时候,除了感觉到整个主屏幕的简单和直接外,最大的感受就是菜单栏和安卓和ios很大的不同。说句实话就是感觉很不习惯,一直在想,如果wp也使用类似的菜单栏的话,会不会能更大程度的降低使用wp的学习成本。所以,今天就给个思路来如何实现安卓的菜单栏。
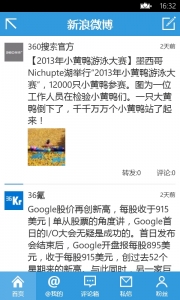
其实wp中有类似安卓菜单栏的应用也不是没见过,比如说zaker里内置的微博。

大致想了一下实现的的方法,思路如下:
要想实现安卓的菜单栏的效果,首先要有一个控件有一组选项,并且选项与选项之间必须是互斥的,很容易想到就是单选按钮(RadioButton)。然后这个互斥之外,还必须有个效果,就是整个按钮整个选择,查阅了一下msdn,最终选择了ToggleButton。所以整个控件的实现就是,用ToggleButton作为RadioButton的模板,最终可以实现效果。
首先定义一个样式
<phone:PhoneApplicationPage.Resources>
    <Style x:Key="AndroidMenuStyle" TargetType="RadioButton">
        <Setter Property="HorizontalContentAlignment" Value="Center"/>
        <Setter Property="Background" Value="Transparent"/>
        <Setter Property="BorderBrush"
        Value="{StaticResource PhoneForegroundBrush}"/>
        <Setter Property="Foreground"
        Value="{StaticResource PhoneForegroundBrush}"/>
        <Setter Property="BorderThickness"
        Value="0"/>
        <Setter Property="FontFamily"
        Value="{StaticResource PhoneFontFamilySemiBold}"/>
        <Setter Property="FontSize"
        Value="{StaticResource PhoneFontSizeMediumLarge}"/>
        <Setter Property="Padding" Value="8"/>
        <Setter Property="Template">
            <Setter.Value>
                <ControlTemplate TargetType="ToggleButton">
                    <Grid Background="Transparent" >
                        <VisualStateManager.VisualStateGroups>
                            <VisualStateGroup x:Name="CommonStates">
                                <VisualState x:Name="Normal"/>
                                <VisualState x:Name="Disabled">
                                    <Storyboard>
                                        <ObjectAnimationUsingKeyFrames Storyboard.TargetName="EnabledBackground" Storyboard.TargetProperty="Visibility">
                                            <DiscreteObjectKeyFrame KeyTime="0">
                                                <DiscreteObjectKeyFrame.Value>
                                                    <Visibility>Collapsed</Visibility>
                                                </DiscreteObjectKeyFrame.Value>
                                            </DiscreteObjectKeyFrame>
                                        </ObjectAnimationUsingKeyFrames>
                                        <ObjectAnimationUsingKeyFrames Storyboard.TargetName="DisabledBackground" Storyboard.TargetProperty="Visibility">
                                            <DiscreteObjectKeyFrame KeyTime="0">
                                                <DiscreteObjectKeyFrame.Value>
                                                    <Visibility>Visible</Visibility>
                                                </DiscreteObjectKeyFrame.Value>
                                            </DiscreteObjectKeyFrame>
                                        </ObjectAnimationUsingKeyFrames>
                                    </Storyboard>
                                </VisualState>
                            </VisualStateGroup>
                            <VisualStateGroup x:Name="CheckStates">
                                <VisualState x:Name="Unchecked" />
                                <!--选中时候的样式-->
                                <VisualState x:Name="Checked">
                                    <Storyboard>
                                        <!--选中时的样式-->
                                        <ObjectAnimationUsingKeyFrames Storyboard.TargetName="EnabledBackground" Storyboard.TargetProperty="Background">
                                            <DiscreteObjectKeyFrame KeyTime="0" Value="#FF1BA1E2" />
                                        </ObjectAnimationUsingKeyFrames>
                                        <ObjectAnimationUsingKeyFrames Storyboard.TargetName="DisabledBackground" Storyboard.TargetProperty="Background">
                                            <DiscreteObjectKeyFrame KeyTime="0" Value="{StaticResource PhoneDisabledBrush}" />
                                        </ObjectAnimationUsingKeyFrames>
                                    </Storyboard>
                                </VisualState>
                            </VisualStateGroup>
                        </VisualStateManager.VisualStateGroups>
                        <Border x:Name="EnabledBackground"
                Background="{TemplateBinding Background}"
                BorderBrush="{TemplateBinding BorderBrush}"
                BorderThickness="{TemplateBinding BorderThickness}"
                Margin="0">
                            <ContentControl x:Name="EnabledContent" Foreground=
            "{TemplateBinding Foreground}" HorizontalContentAlignment=
            "{TemplateBinding HorizontalContentAlignment}"
            VerticalContentAlignment=
            "{TemplateBinding VerticalContentAlignment}"
            Margin="{TemplateBinding Padding}"
            Content="{TemplateBinding Content}"
            ContentTemplate="{TemplateBinding ContentTemplate}"/>
                        </Border>
                        <Border x:Name="DisabledBackground" IsHitTestVisible="False"
            Background="Transparent" Visibility="Collapsed"
            BorderBrush="{StaticResource PhoneDisabledBrush}"
            BorderThickness="{TemplateBinding BorderThickness}"
            Margin="0">

                        </Border>
                    </Grid>
                </ControlTemplate>
            </Setter.Value>
        </Setter>
    </Style>
</phone:PhoneApplicationPage.Resources>
然后在屏幕的下方创建一组单选按钮:
<Grid x:Name="ContentPanel" Grid.Row="1"  Background="Blue">
    <StackPanel Orientation="Horizontal" >
        <RadioButton x:Name="rb1"  Checked="RadioButton_Checked" Content="首页" Style="{StaticResource AndroidMenuStyle}" Width="96"/>
        <RadioButton x:Name="rb2"  Checked="RadioButton_Checked" Content="@我"  Style="{StaticResource AndroidMenuStyle}" Width="96"/>
        <RadioButton x:Name="rb3"  Checked="RadioButton_Checked" Content="评论" Style="{StaticResource AndroidMenuStyle}" Width="96"/>
        <RadioButton x:Name="rb4"  Checked="RadioButton_Checked" Content="私信" Style="{StaticResource AndroidMenuStyle}" Width="96"/>
        <RadioButton x:Name="rb5"  Checked="RadioButton_Checked" Content="粉丝" Style="{StaticResource AndroidMenuStyle}" Width="96"/>
    </StackPanel>
</Grid>
前台的效果实现之后,要在后台处理相应的信息:
private void RadioButton_Checked(object sender, RoutedEventArgs e)
{
    if ((sender as RadioButton) == this.rb1)
    {
        tb.Text = "选择了首页";
    }
    else if ((sender as RadioButton) == this.rb2)
    {
        tb.Text = "选择了@我";
    }
    else if ((sender as RadioButton) == this.rb3)
    {
        tb.Text = "选择了评论";
    }
    else if ((sender as RadioButton) == this.rb4)
    {
        tb.Text = "选择了私信";
    }
    else
    {
        tb.Text = "选择了粉丝";
    }
}
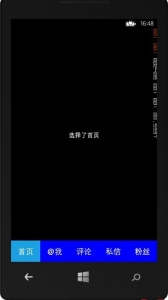
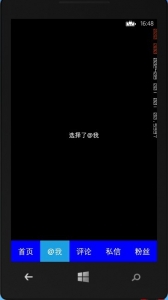
至此,所有工作完成,看一下效果:


当然,要想定制更加真实好看的效果,可以自己修改实现。